Tuesday, September 17, 2019

What to do when a quilt backing is too short for your quilt

So this happened in my studio yesterday...math isn't my best skill and I readily admit seeking assistance from my math saavy friend when needed.  I had a customer quilt to load and it made use of some leftover diamond pieces to form a star on the back of the quilt.


Quilt back

I think I was so concerned about centering the star on the back of the quilt that I didn't really pay attention to  the measurements I had taken of the quilt back and the quilt top.  She had allowed 4" total backing to the length of the quilt which I know is about half as much as I needed.  But still I didn't catch it.  I knew it would be close but I thought we might have just enough if I was careful at the top.

Firstly to center the back this is what I did:

  1. I marked the center line of the star on the left and right sides of the quilt backing
  2. I marked the center of the top with tape on my takeup roller. So now I had a top and side markers for placement.
  3. I then rolled the backing in the normal fashion.
  4. I added the batting.
  5. When it came time to load the quilt top (Note:  I float my quilt tops), I rolled the quilt back to the middle where my left and right markings were.  I centered the quilt horizontally from that point to see how high on the quilt back I would need to start.  It was going to be tight but I figured I could squeak it out. 


Loaded and ready to quilt!
I happily quilted away knowing there was really no way of predicting just how much backing I would have at the bottom and I told the customer.  I was more concerned than she was.

I got to the second to last row and realized I was about an inch short.  I called my customer to explain the situation and she brought me a six inch strip of the backing of fabric.  At this point you are probably envisioning me unloading the quilt and doctoring up the bottom of the backing right?

Wrong!  I really dislike reloading a quilt once I take it off.  I just find that it's very difficult to line up perfectly again so I pondered my situation over the weekend and yesterday I decided to do unroll the quilt partially so that the bottom was hanging over the front bar of my quilting frame.

This is the point where I realized ... oh oh!


I have a table which is the perfect height so I brought out my Janome, set it up on this high table and added the 6" strip to the bottom of the quilt.  I would sew about an inch and move the table forward.  Sew another inch and move the table forward.  It worked like a charm.


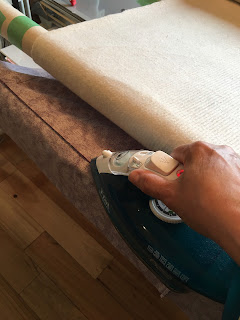
I then used the front roller to press the seam, reloaded the quilt and I was back in business.


I don't know if I broke every rule in the longarmer rule book, but this worked for me and the result was great.  And the bonus was that I only had to reload the bottom of the quilt which kept it straight during the reload process.

Here is the quilt finished.  And a shameless plug:  This is my original quilt pattern called Amish Block Party.  It's available as a download here:  Amish Block Party pattern.


I taught this class in a local quilt store called The Cloth Castle and this is one of my students' quilt.  She did a fabulous job and I had great pleasure in adding the quilting to finish it off.  The panto I used is called "Pearly Weave" and the thread was Glide Mulberry.


I hope this tutorial helps you think outside the box when you need to fix a problem on the fly.

Until next time!

Mavis

Monday, September 16, 2019

Hand Quilting - Choosing your quilt top...lessons learned

Would you say you are a patient person or an impatient one? I think I tend to be more impatient than patient but I’m working on it. .

About this time every year Bonnie Hunter of Quiltville gets ready to release her annual mystery quilt. I always say I’m going to resist, but I never seem to be able to muster up the self-control to do so.

In 2014 Bonnie released her Grand Illusion mystery quilt.  I love Bonnie’s designs, but if I was really honest I’d have to say that this was not my favourite pattern. I ended up doing my own borders because the other ones with the pattern just didn’t ring my bells. 

I was thrilled when I actually finished the quilt top. This was before I had my APQS millennium.  
And I love hand quilting so I decided that I would hand quilt this one.


 Hand quilting stencils and thread are ready to go!


 All pin basted  and ready for the hoop.


I’ve been placing the flowers randomly over the course of the last four years.


When I look back I really wonder why on earth I decided to spend so many hours on a quilt that would be difficult to quilt because of all the intersections and on one that I really didn’t love. I just kept telling myself I would patiently add the stitches and it will be a lifetime project with no deadline in mind. Right?  Wrong! Along came and impatient moment recently where I had enough of staring at it and having it stare back at me nagging me to work on it. Don’t get me wrong; I love hand quilting but I just think I chose the wrong project this time. So after a lot of debate and actually asking for advice from some online hand quilters I made the decision to finish it on my long arm. I really wondered if I would regret this decision. I found a motif that I could continue in a random fashion across the top of the quilt which I had hoped would have the same feeling as the motif that I had chosen to hand quilt. Loading the quilt onto my long arm was not as difficult as I thought it would be and before long I was happily quilting away adding  flower motifs to my quilt top.


It only took me a little bit over a day to finish it. As I continued quilting these randomly placed motifs I could see that there were some spots between motifs that  needed something in them but I didn’t want to put in a full motif as it would have stitched over an existing one. As it is there were a couple of close calls in fact boo-boos where there are stitches overlapping but I’m not letting the quilt police in the door and I warned my daughter who is  the recipient of the quilt that she would have to let go of some OCD tendencies to really enjoy this quilt. 

I found some cute little motifs of butterflies and ladybugs that I could make smaller and I also made some of the flowers smaller just to fill in those little spots that needed a little something to tie it all together. 


Above is a mixture of hand quilting and machine quilting. 

The end result is that I was able to finish the quilt and give it to my daughter to finish binding because she loves doing that, and the quilt is now living on her bed and she cherishes it. 


I’m delighted to have it done and out of the UFO pile. 

Bonus: I had in my closet a whole cloth quilt that I really wanted to work on but I couldn’t give myself permission until this project was completed. So now I have pulled out my whole cloth quilt and I’m happily adding my stitches to that project. And no intersections! 


I didn’t start this quilt from scratch lest you think I’ve done all of this stitching. I actually purchased someone else’s UFO and am finishing it off. And Cooper is enjoying our time together. 


So that’s the story of how I finished my Grand Illusion mystery quilt UFO. I’m so happy to cross another long-standing project off the list.

Until next time, I’ve got some slow stitchin’ to keep me busy. 

Mavis