 |
| Quilt back |
I think I was so concerned about centering the star on the back of the quilt that I didn't really pay attention to the measurements I had taken of the quilt back and the quilt top. She had allowed 4" total backing to the length of the quilt which I know is about half as much as I needed. But still I didn't catch it. I knew it would be close but I thought we might have just enough if I was careful at the top.
Firstly to center the back this is what I did:
- I marked the center line of the star on the left and right sides of the quilt backing
- I marked the center of the top with tape on my takeup roller. So now I had a top and side markers for placement.
- I then rolled the backing in the normal fashion.
- I added the batting.
- When it came time to load the quilt top (Note: I float my quilt tops), I rolled the quilt back to the middle where my left and right markings were. I centered the quilt horizontally from that point to see how high on the quilt back I would need to start. It was going to be tight but I figured I could squeak it out.
 |
| Loaded and ready to quilt! |
I got to the second to last row and realized I was about an inch short. I called my customer to explain the situation and she brought me a six inch strip of the backing of fabric. At this point you are probably envisioning me unloading the quilt and doctoring up the bottom of the backing right?
Wrong! I really dislike reloading a quilt once I take it off. I just find that it's very difficult to line up perfectly again so I pondered my situation over the weekend and yesterday I decided to do unroll the quilt partially so that the bottom was hanging over the front bar of my quilting frame.
 |
| This is the point where I realized ... oh oh! |
I have a table which is the perfect height so I brought out my Janome, set it up on this high table and added the 6" strip to the bottom of the quilt. I would sew about an inch and move the table forward. Sew another inch and move the table forward. It worked like a charm.
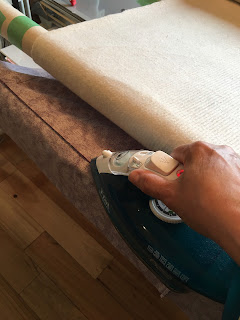
I then used the front roller to press the seam, reloaded the quilt and I was back in business.
I don't know if I broke every rule in the longarmer rule book, but this worked for me and the result was great. And the bonus was that I only had to reload the bottom of the quilt which kept it straight during the reload process.
Here is the quilt finished. And a shameless plug: This is my original quilt pattern called Amish Block Party. It's available as a download here: Amish Block Party pattern.
I taught this class in a local quilt store called The Cloth Castle and this is one of my students' quilt. She did a fabulous job and I had great pleasure in adding the quilting to finish it off. The panto I used is called "Pearly Weave" and the thread was Glide Mulberry.
I hope this tutorial helps you think outside the box when you need to fix a problem on the fly.
Until next time!
Mavis


No comments:
Post a Comment