Frustration point #1 - how come the back suddenly wasn't wide enough when it was when I measured? Dunno, but I'll put down to fatigue and eyeballs not working.
So I added some width to the centre and sides of the quilt in coordinating fabric (no pictures at this point...maybe later if I'm happy with it).
Frustration point #2 - that wasn't fun pinning to the floor and I have a hard time basting that way, on hands and knees with some physical limitations, so maybe I should load it onto the frame and just work with it the best I can and then fill in what I need to on the domestic later. I have a Janome 6500 on my B-Line frame so I am limited by the throat space of the machine but it sure is a lot better than struggling with a large quilt without a frame. I'm really not complaining! :o)
Then I was waiting for an aha! moment to figure out how to mark the quilt. Then it came to me...the bridal tulle method! And no, I don't think it was because I've got 'wedding' on the brain with my niece's wedding quilt not done and the wedding being today...that's another story for another time. So, for those who don't know about the 'bridal tulle' method of marking a quilt, I've taken some photos along the way to share. This is the 'good' part of my blog post title. The 'bad' and the 'ugly' will come later but don't despair, it's not about marking the quilt...I don't want to lose you now.
Quilt Marking - Bridal Tulle Method:
Step 1 - Draw, print, or photocopy your desired quilting design onto paper. I used my Quilting Designs disc and found this one.
Step 2 - Cut a piece of bridal tulle the same size (or just beyond the same size) as your quilting motif/design.
Step 3 - Spray some temporary adhesive to the front of the paper. Press the bridal tulle down (like you would the batting on the wrong side of the backing of a quilt). This stablizes the tulle.
Step 4 - Using a PERMANENT sharpie (I use a medium tip, not fine) draw on the tulle, tracing over the quilting design.

Step 5 - Once finished, rinse the tulle in warm water and towel dry. Do NOT iron it. It will melt!
See how the image is now on the tulle (faint but there). This is why you use a wider tipped marker and not a fine tip. It would be even harder to see.

And here's the image totally traced onto the tulle and ready to transfer.

Step 6 - Choose your quilt marker. I have a chalk wheelie thingy (Clover brand I think), I have chalk pencils, but I also have washable Crayola markers. After a discussion with a quilting friend of mine on the bus ride home the other day, she assured me that Crayola markers wash out just fine (except blue) so I went on a hunt in my daughter's desk drawer and VOILA! Orange.
Step 7 - Test your marker. Here is my orange tested on a piece of neutral batik fabric.
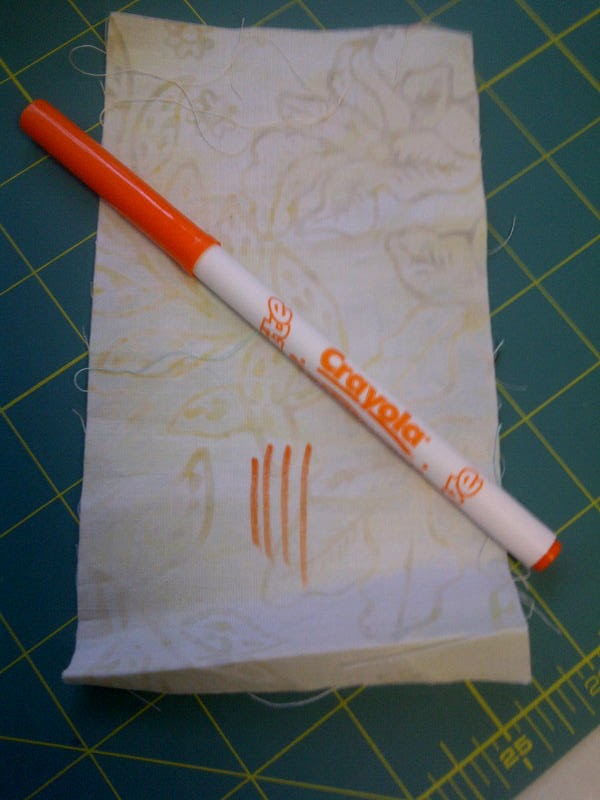
Phew!! And here it is after a quick rinse under the tap with warm water and a bit of scrubbing. It has passed my test and I'm ready to mark my quilt.

Step 8 - Okay, now you're ready to transfer the image to your quilt top in preparation for stitching. This assumes that you've already got your quilt sandwiched whether on a frame or by hand with pins, spray or your favourite method. But you can also pre-mark your quilt top first and then sandwich. I loaded mine on to my B-Line frame before I marked it because I still wasn't sure what I was going to do for quilting it until the last minute.
This is the tulle laid over the quilt top before transferring the image:

Step 9 - Take your marker (whichever one you choose) and proceed to trace over the faint black line left by the sharpie on the tulle. Because the tulle is a bunch of holes, the ink from your quilt marker (in my case, orange crayola marker) goes right through onto the quilt top. See?

No top marks for drawing but there's enough to follow and it won't fade or get brushed off (as with chalk) until you wet it. I would caution you against ironing the quilt top with the marker on. I'm not sure what would happen but I would suggest avoiding that.
Step 10 - Time for quilting!! Here's some photos of the quilted blocks:


I've now pulled my quilt off the frame because I want to quilt the rest with 'stitch in the ditch' for the kaleidoscope squares (I think! ~ the jury is still out on the final quilt for those blocks but I know it won't be on the frame). As for the border, I think I will free-motion around the flower images.
Anyway, that method sure did the job! I'm so glad I remembered that bridal tulle technique. Who knows, maybe it was a subliminal message from the fact that we've got a family wedding this afternoon. I'm just grateful for the inspiration just in the nick of time.
Now the bad and the ugly....and with this comes a warning. Never use 505 adhesive on a quilt backing and then put it on your frame without washing it out. Why you ask? CREASES!
Imagine my horror after pulling this off the frame, turning the quilt over and discovering a crease sewn down on the back of my quilt in a corner. WHAT??!!! @#@$(@)&@$~~!! I thought the whole purpose of a quilting frame was to avoid this nonsense?! Then I realized that it was the adhesive. In my haste of the looming deadline, I guess I didn't hold it taut enough to unglue a fold that had happened while the quilt back was on the carpet. So, yes, last night I spent some quality time with my seam ripper uncreasing the corner on the back of my quilt to remove the fold. I was aggravated but am hoping that with a gentle press of the iron (on the back, not on the front where the ink is) will smooth out the fold/crease and use the adhesive to my advantage to make sure it stays flat so that I can requilt that area without more aggravation.
So, that's my story/tutorial friends. I hope you can learn from my mistakes and use the bridal tulle method to create beautiful quilts. I'm going to refill my coffee cup and head back to the studio to get this quilt finished. Oh yeah...one more caution...don't leave Crayola ink on your quilt top for very long. Time could set the ink so get it done as quick as you can and washed. I'm having a bit of anxiety over that so I best get to my machine soon.
Let's get busy!
Mavis
What an ordeal! But it is lovely!!!! Hugs, Doreen
ReplyDeleteWow - hope you get everything done for your show and to your liking. I haven't tried the tulle method. Thanks for the tutorial.
ReplyDeleteJudy